Categories
Home automation using relay

Created By

Roshan Baig
My name is Roshan, I am 13 years old and I am in 7th standard. My hobbies are horse riding, robotics, and computer programming.
About This Project
Home automation using relay For my robotics class graduation, I got the idea to do this
Components Required
- Arduino UNO
- Power Relay, SPDT
- PIR Motion Sensor (Genric)
- Temperature Sensor
- IR Receiver
- 6 Pin Gas Sensor
- LED Light Bulb, Frosted GLS
- DC Motor
- Buzzer, Piezo
- Resistor 10k ohm
- 9V battery
- General Purpose Transistor NPN
- 1N4007- High Voltage,High Current , Rated Diode
- Resistor 1k ohm
Schematics
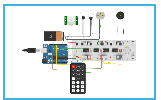
In this image all the components with the connections are given

Code Of Project
// declare integer variables
int PIR = 0;
int temp = 0;
int IR = 0;
int gas = 0;
void setup()
{
  // declare inputs
  pinMode(6, INPUT);
  pinMode(7, INPUT);
  pinMode(5, INPUT);
  pinMode(4, INPUT);
  // declare outputs
  pinMode(13, OUTPUT);
  pinMode(12, OUTPUT);
  pinMode(11, OUTPUT);
  pinMode(10, OUTPUT);
  // begin the serial port with a baud rate of 9600
  Serial.begin(9600);
}
void loop()
{
  // declare variables
  PIR = digitalRead(4);
  temp = analogRead(5);
  IR = digitalRead(7);
  gas = analogRead(6);
  // if else statements
  if(temp >= 500)
  {
    digitalWrite(12, HIGH);
    Serial.println("fan on");
  }else
  {
    digitalWrite(12, LOW);
    Serial.println("fan off");
  }
  if(PIR == 1)
  {
    digitalWrite(13, HIGH);
    Serial.println("lights on");
  }else
  {
     digitalWrite(13, LOW);
    Serial.println("lights off");
  }
  if(gas >= 200)
  {
     digitalWrite(10, HIGH);
    Serial.println("gas leak");
  }else
  {
    digitalWrite(10, LOW);
  }
  if( IR == 1)
  {
    digitalWrite(11, HIGH);
    Serial.print("signal received");
  }else
  {
    digitalWrite(11, LOW);
  }
  delay(30);// delay 30 milliseconds to let things settle
}
